We recommend that you start using code scanning with default setup. After you've initially configured default setup, you can evaluate code scanning to see how it's working for you and customize it to better meet your needs. For more information, see コード スキャンのセットアップの種類について.
Prerequisites
Your repository is eligible for default setup for code scanning if:
- GitHub Actions が有効になっています。
- 一般公開されているか、GitHub Code Security が有効になっている。
Configuring default setup for a repository
メモ
If the analyses fail for all CodeQL-supported languages in a repository, default setup will still be enabled, but it will not run any scans or use any GitHub Actions minutes until another CodeQL-supported language is added to the repository or default setup is manually reconfigured, and the analysis of a CodeQL-supported language succeeds.
-
GitHub で、リポジトリのメイン ページに移動します。
メモ
If you are configuring default setup on a fork, you must first enable GitHub Actions. To enable GitHub Actions, under your repository name, click Actions, then click I understand my workflows, go ahead and enable them. Be aware that this will enable all existing workflows on your fork.
-
リポジトリ名の下にある [Settings] をクリックします。 [設定] タブが表示されない場合は、 [] ドロップダウン メニューを選び、 [設定] をクリックします。
![タブを示すリポジトリ ヘッダーのスクリーンショット。 [設定] タブが濃いオレンジ色の枠線で強調表示されています。](/assets/cb-28260/images/help/repository/repo-actions-settings.png)
-
サイドバーの [Security] セクションで、[ Advanced Security] をクリックします。
-
[Code Security] の下の [CodeQL analysis] の右側で、[Set up ] を選んでから、[Default] をクリックします。
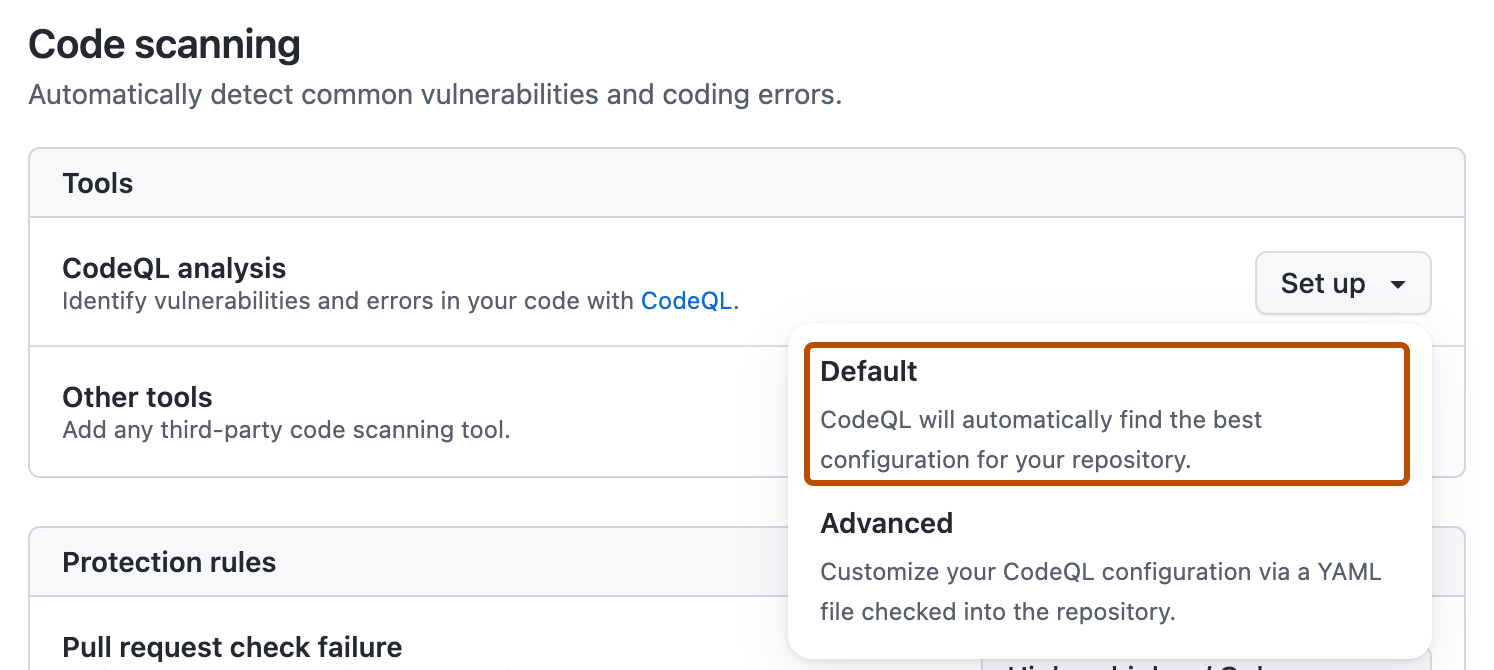
You will then see a "CodeQL default configuration" dialog summarizing the code scanning configuration automatically created by default setup.
-
Optionally, to customize your code scanning setup, click Edit.
- To add or remove a language from the analysis performed by default setup, select or deselect that language in the "Languages" section.
- To specify the CodeQL query suite you would like to use, select your preferred query suite in the "Query suites" section.
-
Review the settings for default setup on your repository, then click Enable CodeQL. This will trigger a workflow that tests the new, automatically generated configuration.
メモ
If you are switching to default setup from advanced setup, you will see a warning informing you that default setup will override existing code scanning configurations. This warning means default setup will disable the existing workflow file and block any CodeQL analysis API uploads.
-
If projects in your repository depend on dependencies in private package registries, you can grant code scanning access to them. This can improve the outcomes and quality of analyses. See セキュリティ機能にプライベート レジストリへのアクセスを許可する.
-
Optionally, adjust other configuration options which affect default setup. See code scanning のリポジトリのプロパティ.
-
Optionally, to view your default setup configuration after enablement, select , then click View CodeQL configuration.
![タブを示すリポジトリ ヘッダーのスクリーンショット。 [設定] タブが濃いオレンジ色の枠線で強調表示されています。](/assets/cb-28260/mw-1440/images/help/repository/repo-actions-settings.webp)

メモ
If no pushes and pull requests have occurred in a repository with default setup enabled for 6 months, the weekly schedule will be disabled to save your GitHub Actions minutes.
Running default setup on self-hosted or より大きなランナー (larger runner)
You can use default setup for all CodeQL-supported languages on self-hosted runners or GitHub-hosted runners.
メモ
Code scanning sees assigned runners when default setup is enabled. If a runner is assigned to a repository that is already running default setup, you must disable and re-enable default setup to start using the runner. If you add a runner and want to start using it, you can change the configuration manually without needing to disable and re-enable default setup.
Assigning labels to self-hosted runners
To assign a self-hosted runner for default setup, you can use the default code-scanning label, or you can optionally give them custom labels so that individual repositories can use different runners. For information about assigning labels to self-hosted runners, see セルフホストランナーとのラベルの利用.
Once you've assigned custom labels to self-hosted runners, your repositories can use those runners for code scanning default setup.
You can also use security configurations to assign labels to self-hosted runners for code scanning. See カスタム セキュリティ構成を作成する.
Assigning より大きなランナー (larger runner)
To assign a より大きなランナー, name the runner code-scanning. This will automatically add the code-scanning label to the より大きなランナー. An organization can only have one より大きなランナー with the code-scanning label, and that runner will handle all code scanning jobs from repositories within your organization with access to the runner's group. See Configuring larger runners for default setup.
Ensuring build support
Default setup uses the none build mode for C/C++、 C#、 Java および Rust and uses the autobuild build mode for other compiled languages. You should configure your self-hosted runners to make sure they can run all the necessary commands for C/C++, C#, and Swift analysis. Analysis of JavaScript/TypeScript, Go, Ruby, Python, and Kotlin code does not currently require special configuration.
Next steps
After your configuration runs successfully at least once, you can start examining and resolving code scanning alerts. For more information on code scanning alerts, see Code scanningアラートについて and リポジトリのコード スキャンのアラートの評価.
After you've configured default setup for code scanning, you can read about evaluating how it's working for you and the next steps you can take to customize it. For more information, see コード スキャンの既定のセットアップの評価.
You can find detailed information about your code scanning configuration, including timestamps for each scan and the percentage of files scanned, on the tool status page. For more information, see Use the tool status page for code scanning.
When you configure default setup, you may encounter an error. For information on troubleshooting specific errors, see コード スキャン分析エラーのトラブルシューティング.