Эта версия этой статьи предназначена для использования пользовательских инструкций репозитория на GitHub сайте. Щелкните приведенные выше вкладки, чтобы получить сведения об использовании пользовательских инструкций в других средах.
Введение
Пользовательские инструкции репозитория позволяют предоставлять Copilot с рекомендациями и предпочтениями для конкретного репозитория. Дополнительные сведения см. в разделе О кастомизации ответов GitHub Copilot.
Предварительные требования для пользовательских инструкций репозитория
-
У вас должен быть пользовательский файл инструкций (см. приведенные ниже инструкции).
-
Для Обзор кода Copilot, ваш личный выбор использования пользовательских инструкций должен быть настроен как включённый. Эта функция включена по умолчанию. См. инструкции по включению или отключению пользовательских инструкций репозитория далее в этой статье.
Создание пользовательских инструкций
Copilot ON GitHub поддерживает три типа пользовательских инструкций репозитория. Для подробностей о том, какие GitHub Copilot функции поддерживают такие инструкции, см. [AUTOTITLE.](/copilot/concepts/prompting/response-customization?tool=webui#support-for-repository-custom-instructions)
* Пользовательские инструкции на уровне репозитория применяются ко всем запросам, сделанным в контексте репозитория.
Они указаны в copilot-instructions.md файле в .github каталоге репозитория. Дополнительные инструкции см. в статье "Создание пользовательских инструкций на уровне репозитория".
-
**Пользовательские инструкции** , относящиеся к пути, применяются к запросам, сделанным в контексте файлов, которые соответствуют указанному пути.Они указываются в одном или нескольких
NAME.instructions.mdфайлах внутри или ниже.github/instructionsкаталога репозитория. Дополнительные инструкции см. в статье "Создание пользовательских инструкций для конкретного пути".Если выбранный вами путь совпадает с работающим файлом Copilot , и существует пользовательский файл инструкций на весь репозиторий, то используются инструкции из обоих файлов.
-
**Инструкции** агента используются агентами ИИ.Вы можете создать один или несколько
AGENTS.mdфайлов, хранящихся в любом месте репозитория. Когда Copilot работает, приоритет будет иметь ближайшийAGENTS.mdфайл в дереве каталогов. Для получения дополнительной информации смотрите репозиторий agentsmd/agents.md.Кроме того, можно использовать один
CLAUDE.mdилиGEMINI.mdфайл, хранящийся в корневом каталоге репозитория.
Создание пользовательских инструкций на уровне репозитория
Вы можете создать собственный пользовательский файл инструкций с нуля. См. статью "Написание собственного copilot-instructions.md файла". В качестве альтернативы вы можете попросить Агент кодирования Copilot сделать его для вас.
Запрос Агент кодирования Copilot на генерацию copilot-instructions.md файла
-
Перейдите на вкладку «Агенты» в github.com/copilot/agents.
Вы также можете попасть на эту страницу, нажав кнопку рядом с поисковой строкой на любой странице GitHub, а затем выбрав «Агенты » из боковой панели.
-
Используя выпадающее меню в поле запросов, выберите репозиторий, для которого хотите Copilot сгенерировать пользовательские инструкции.
-
Скопируйте следующий запрос и вставьте его в поле подсказки, при необходимости настроив его:
Markdown Your task is to "onboard" this repository to Copilot coding agent by adding a .github/copilot-instructions.md file in the repository that contains information describing how a coding agent seeing it for the first time can work most efficiently. You will do this task only one time per repository and doing a good job can SIGNIFICANTLY improve the quality of the agent's work, so take your time, think carefully, and search thoroughly before writing the instructions. <Goals> - Reduce the likelihood of a coding agent pull request getting rejected by the user due to generating code that fails the continuous integration build, fails a validation pipeline, or having misbehavior. - Minimize bash command and build failures. - Allow the agent to complete its task more quickly by minimizing the need for exploration using grep, find, str_replace_editor, and code search tools. </Goals> <Limitations> - Instructions must be no longer than 2 pages. - Instructions must not be task specific. </Limitations> <WhatToAdd> Add the following high level details about the codebase to reduce the amount of searching the agent has to do to understand the codebase each time: <HighLevelDetails> - A summary of what the repository does. - High level repository information, such as the size of the repo, the type of the project, the languages, frameworks, or target runtimes in use. </HighLevelDetails> Add information about how to build and validate changes so the agent does not need to search and find it each time. <BuildInstructions> - For each of bootstrap, build, test, run, lint, and any other scripted step, document the sequence of steps to take to run it successfully as well as the versions of any runtime or build tools used. - Each command should be validated by running it to ensure that it works correctly as well as any preconditions and postconditions. - Try cleaning the repo and environment and running commands in different orders and document errors and misbehavior observed as well as any steps used to mitigate the problem. - Run the tests and document the order of steps required to run the tests. - Make a change to the codebase. Document any unexpected build issues as well as the workarounds. - Document environment setup steps that seem optional but that you have validated are actually required. - Document the time required for commands that failed due to timing out. - When you find a sequence of commands that work for a particular purpose, document them in detail. - Use language to indicate when something should always be done. For example: "always run npm install before building". - Record any validation steps from documentation. </BuildInstructions> List key facts about the layout and architecture of the codebase to help the agent find where to make changes with minimal searching. <ProjectLayout> - A description of the major architectural elements of the project, including the relative paths to the main project files, the location of configuration files for linting, compilation, testing, and preferences. - A description of the checks run prior to check in, including any GitHub workflows, continuous integration builds, or other validation pipelines. - Document the steps so that the agent can replicate these itself. - Any explicit validation steps that the agent can consider to have further confidence in its changes. - Dependencies that aren't obvious from the layout or file structure. - Finally, fill in any remaining space with detailed lists of the following, in order of priority: the list of files in the repo root, the contents of the README, the contents of any key source files, the list of files in the next level down of directories, giving priority to the more structurally important and snippets of code from key source files, such as the one containing the main method. </ProjectLayout> </WhatToAdd> <StepsToFollow> - Perform a comprehensive inventory of the codebase. Search for and view: - README.md, CONTRIBUTING.md, and all other documentation files. - Search the codebase for build steps and indications of workarounds like 'HACK', 'TODO', etc. - All scripts, particularly those pertaining to build and repo or environment setup. - All build and actions pipelines. - All project files. - All configuration and linting files. - For each file: - think: are the contents or the existence of the file information that the coding agent will need to implement, build, test, validate, or demo a code change? - If yes: - Document the command or information in detail. - Explicitly indicate which commands work and which do not and the order in which commands should be run. - Document any errors encountered as well as the steps taken to workaround them. - Document any other steps or information that the agent can use to reduce time spent exploring or trying and failing to run bash commands. - Finally, explicitly instruct the agent to trust the instructions and only perform a search if the information in the instructions is incomplete or found to be in error. </StepsToFollow> - Document any errors encountered as well as the steps taken to work-around them.
Your task is to "onboard" this repository to Copilot coding agent by adding a .github/copilot-instructions.md file in the repository that contains information describing how a coding agent seeing it for the first time can work most efficiently. You will do this task only one time per repository and doing a good job can SIGNIFICANTLY improve the quality of the agent's work, so take your time, think carefully, and search thoroughly before writing the instructions. <Goals> - Reduce the likelihood of a coding agent pull request getting rejected by the user due to generating code that fails the continuous integration build, fails a validation pipeline, or having misbehavior. - Minimize bash command and build failures. - Allow the agent to complete its task more quickly by minimizing the need for exploration using grep, find, str_replace_editor, and code search tools. </Goals> <Limitations> - Instructions must be no longer than 2 pages. - Instructions must not be task specific. </Limitations> <WhatToAdd> Add the following high level details about the codebase to reduce the amount of searching the agent has to do to understand the codebase each time: <HighLevelDetails> - A summary of what the repository does. - High level repository information, such as the size of the repo, the type of the project, the languages, frameworks, or target runtimes in use. </HighLevelDetails> Add information about how to build and validate changes so the agent does not need to search and find it each time. <BuildInstructions> - For each of bootstrap, build, test, run, lint, and any other scripted step, document the sequence of steps to take to run it successfully as well as the versions of any runtime or build tools used. - Each command should be validated by running it to ensure that it works correctly as well as any preconditions and postconditions. - Try cleaning the repo and environment and running commands in different orders and document errors and misbehavior observed as well as any steps used to mitigate the problem. - Run the tests and document the order of steps required to run the tests. - Make a change to the codebase. Document any unexpected build issues as well as the workarounds. - Document environment setup steps that seem optional but that you have validated are actually required. - Document the time required for commands that failed due to timing out. - When you find a sequence of commands that work for a particular purpose, document them in detail. - Use language to indicate when something should always be done. For example: "always run npm install before building". - Record any validation steps from documentation. </BuildInstructions> List key facts about the layout and architecture of the codebase to help the agent find where to make changes with minimal searching. <ProjectLayout> - A description of the major architectural elements of the project, including the relative paths to the main project files, the location of configuration files for linting, compilation, testing, and preferences. - A description of the checks run prior to check in, including any GitHub workflows, continuous integration builds, or other validation pipelines. - Document the steps so that the agent can replicate these itself. - Any explicit validation steps that the agent can consider to have further confidence in its changes. - Dependencies that aren't obvious from the layout or file structure. - Finally, fill in any remaining space with detailed lists of the following, in order of priority: the list of files in the repo root, the contents of the README, the contents of any key source files, the list of files in the next level down of directories, giving priority to the more structurally important and snippets of code from key source files, such as the one containing the main method. </ProjectLayout> </WhatToAdd> <StepsToFollow> - Perform a comprehensive inventory of the codebase. Search for and view: - README.md, CONTRIBUTING.md, and all other documentation files. - Search the codebase for build steps and indications of workarounds like 'HACK', 'TODO', etc. - All scripts, particularly those pertaining to build and repo or environment setup. - All build and actions pipelines. - All project files. - All configuration and linting files. - For each file: - think: are the contents or the existence of the file information that the coding agent will need to implement, build, test, validate, or demo a code change? - If yes: - Document the command or information in detail. - Explicitly indicate which commands work and which do not and the order in which commands should be run. - Document any errors encountered as well as the steps taken to workaround them. - Document any other steps or information that the agent can use to reduce time spent exploring or trying and failing to run bash commands. - Finally, explicitly instruct the agent to trust the instructions and only perform a search if the information in the instructions is incomplete or found to be in error. </StepsToFollow> - Document any errors encountered as well as the steps taken to work-around them. -
Click or press Enter.
Copilot will start a new session, which will appear in the list below the prompt box. Copilot will create a draft pull request, write your custom instructions, push them to the branch, then add you as a reviewer when it has finished, triggering a notification.
Writing your own copilot-instructions.md file
-
In the root of your repository, create a file named
.github/copilot-instructions.md.Create the
.githubdirectory if it does not already exist. -
Add natural language instructions to the file, in Markdown format.
Whitespace between instructions is ignored, so the instructions can be written as a single paragraph, each on a new line, or separated by blank lines for legibility.
Совет
The first time you create a pull request in a given repository with Агент кодирования Copilot, Copilot will leave a comment with a link to automatically generate custom instructions for the repository.
Creating path-specific custom instructions
Примечание.
Currently, on GitHub.com, path-specific custom instructions are only supported for Агент кодирования Copilot and Обзор кода Copilot.
-
Создайте каталог,
.github/instructionsесли он еще не существует. -
По желанию создайте подкаталоги
.github/instructionsдля организации ваших файлов инструкций. -
Создайте один или несколько
NAME.instructions.mdфайлов, гдеNAMEуказывается назначение инструкций. Имя файла должно заканчиваться.instructions.md. -
В начале файла создайте блок frontmatter, содержащий ключевое
applyToслово. Используйте синтаксис glob, чтобы указать, к каким файлам или каталогам применяются инструкции.Например:
---
applyTo: "app/models/**/*.rb"
---
Можно указать несколько шаблонов, разделив их запятыми. Например, чтобы применить инструкции ко всем файлам TypeScript в репозитории, можно использовать следующий блок frontmatter:
---
applyTo: "**/*.ts,**/*.tsx"
---
Примеры Glob:
-
`*` - все будут совпадать со всеми файлами текущей директории. -
`**` или `**/*` — все совпадут со всеми файлами во всех каталогах. -
`*.py` - будет совпадать со всеми `.py` файлами текущей папки. -
`**/*.py` - будет рекурсивно совпадать со всеми `.py` файлами во всех каталогах. -
`src/*.py`- будет `.py` совпадать со всеми `src` файлами в каталоге. Например `src/foo.py` , и `src/bar.py`_нет_`src/foo/bar.py`. -
`src/**/*.py` - будет рекурсивно совпадать со всеми `.py` файлами в `src` каталоге. Например, `src/foo.py`, `src/foo/bar.py`и `src/foo/bar/baz.py`. -
`**/subdir/**/*.py` - будет рекурсивно совпадать со всеми `.py` файлами в любой `subdir` папке на любой глубине. Например, `subdir/foo.py`, `subdir/nested/bar.py`, `parent/subdir/baz.py`, и `deep/parent/subdir/nested/qux.py`, но _не_`foo.py` на пути, не содержащем каталога `subdir` .
-
-
Опционально, чтобы предотвратить использование файла либо Агент кодирования Copilot одним из вариантов Обзор кода Copilot, добавьте
excludeAgentключевое слово в блок фронтматтера. Используйте либо или"code-review"``"coding-agent".Например, следующий файл будет читаться только .Агент кодирования Copilot
---
applyTo: "**"
excludeAgent: "code-review"
---
Если ключевое
excludeAgentслово не включено в передний блок Matterblock, оба Обзор кода Copilot и Агент кодирования Copilot будут использовать ваши инструкции. -
Добавьте пользовательские инструкции на естественном языке с помощью формата Markdown. Пробелы между инструкциями игнорируются, поэтому инструкции могут быть написаны как один абзац, каждый из которых находится на новой строке или разделен пустыми строками для удобочитаемости.
Вы успешно добавили в репозиторий пользовательский файл инструкций?
          <a href="https://docs.github.io/success-test/yes.html" target="_blank" class="btn btn-outline mt-3 mr-3 no-underline">
          <span>Да</span></a><a href="https://docs.github.io/success-test/no.html" target="_blank" class="btn btn-outline mt-3 mr-3 no-underline"><span>нет</span></a>
Пользуемые инструкции
Инструкции в файлах доступны для использования Copilot сразу после сохранения файла(ов). Инструкции автоматически добавляются к запросам, которые вы отправляете в Copilot.
In Копилот Чат (github.com/copilot), you can start a conversation that uses repository custom instructions by adding, as an attachment, the repository that contains the instructions file.
Whenever repository custom instructions are used by Копилот Чат, the instructions file is added as a reference for the response that's generated. To find out whether repository custom instructions were used, expand the list of references at the top of a chat response in the Chat panel and check whether the .github/copilot-instructions.md file is listed.

You can click the reference to open the file.
Примечание.
- К запросу, отправленному на Copilot, может применяться несколько типов пользовательских инструкций. Личные инструкции имеют высший приоритет. Далее идут инструкции по репозиторию, а затем приоритетом ставятся инструкции по организации последними. Однако все наборы соответствующих инструкций предоставляются для Copilot.
- По возможности старайтесь избегать противоречивых наборов инструкций. Если вас беспокоит качество отклика, вы можете временно отключить инструкции репозитория. См . раздел AUTOTITLE.
Enabling or disabling custom instructions for Обзор кода Copilot
Custom instructions are enabled for Обзор кода Copilot by default but you can disable, or re-enable, them in the repository settings on GitHub.com. This applies to Copilot's use of custom instructions for all code reviews it performs in this repository.
-
На GitHubперейдите на главную страницу репозитория.
-
Под именем репозитория щелкните Settings. Если вкладка "Параметры" не отображается, выберите раскрывающееся меню и нажмите кнопку "Параметры".

-
In the "Code & automation" section of the sidebar, click Copilot, then Code review.
-
Toggle the “Use custom instructions when reviewing pull requests” option on or off.

Примечание.
При просмотре pull-запроса Copilot использует пользовательские инструкции в базовой ветви pull request. Например, если ваш pull-запрос стремится объединиться my-feature-branch с main, Copilot будет использовать пользовательские инструкции в main.
Further reading
This version of this article is for using repository custom instructions and prompt files in VS Code. Click the tabs above for instructions on using custom instructions in other environments.
Введение
Пользовательские инструкции репозитория позволяют предоставлять Copilot с рекомендациями и предпочтениями для конкретного репозитория. Дополнительные сведения см. в разделе О кастомизации ответов GitHub Copilot.
Предварительные требования для пользовательских инструкций репозитория
-
У вас должен быть пользовательский файл инструкций (см. приведенные ниже инструкции).
-
Custom instructions must be enabled. This feature is enabled by default. See Enabling or disabling repository custom instructions later in this article.
Creating custom instructions
VS Code supports three types of repository custom instructions. For details of which GitHub Copilot features support these types of instructions, see О кастомизации ответов GitHub Copilot.
-
Repository-wide custom instructions, which apply to all requests made in the context of a repository.
These are specified in a
copilot-instructions.mdfile in the.githubdirectory of the repository. See Creating repository-wide custom instructions. -
Path-specific custom instructions, which apply to requests made in the context of files that match a specified path.
These are specified in one or more
NAME.instructions.mdfiles within or below the.github/instructionsdirectory in the repository. See Creating path-specific custom instructions.If the path you specify matches a file that Copilot is working on, and a repository-wide custom instructions file also exists, then the instructions from both files are used.
-
Agent instructions are used by AI agents.
Вы можете создать один или несколько
AGENTS.mdфайлов, хранящихся в любом месте репозитория. Когда Copilot работает, приоритет будет иметь ближайшийAGENTS.mdфайл в дереве каталогов. Для получения дополнительной информации смотрите репозиторий agentsmd/agents.md.Примечание.
Support of
AGENTS.mdfiles outside of the workspace root is currently turned off by default. For details of how to enable this feature, see Use custom instructions in VS Code in the VS Code documentation.
Creating repository-wide custom instructions
-
In the root of your repository, create a file named
.github/copilot-instructions.md.Create the
.githubdirectory if it does not already exist. -
Add natural language instructions to the file, in Markdown format.
Whitespace between instructions is ignored, so the instructions can be written as a single paragraph, each on a new line, or separated by blank lines for legibility.
Creating path-specific custom instructions
-
Создайте каталог,
.github/instructionsесли он еще не существует. -
По желанию создайте подкаталоги
.github/instructionsдля организации ваших файлов инструкций. -
Создайте один или несколько
NAME.instructions.mdфайлов, гдеNAMEуказывается назначение инструкций. Имя файла должно заканчиваться.instructions.md. -
В начале файла создайте блок frontmatter, содержащий ключевое
applyToслово. Используйте синтаксис glob, чтобы указать, к каким файлам или каталогам применяются инструкции.Например:
---
applyTo: "app/models/**/*.rb"
---
Можно указать несколько шаблонов, разделив их запятыми. Например, чтобы применить инструкции ко всем файлам TypeScript в репозитории, можно использовать следующий блок frontmatter:
---
applyTo: "**/*.ts,**/*.tsx"
---
Примеры Glob:
-
`*` - все будут совпадать со всеми файлами текущей директории. -
`**` или `**/*` — все совпадут со всеми файлами во всех каталогах. -
`*.py` - будет совпадать со всеми `.py` файлами текущей папки. -
`**/*.py` - будет рекурсивно совпадать со всеми `.py` файлами во всех каталогах. -
`src/*.py`- будет `.py` совпадать со всеми `src` файлами в каталоге. Например `src/foo.py` , и `src/bar.py`_нет_`src/foo/bar.py`. -
`src/**/*.py` - будет рекурсивно совпадать со всеми `.py` файлами в `src` каталоге. Например, `src/foo.py`, `src/foo/bar.py`и `src/foo/bar/baz.py`. -
`**/subdir/**/*.py` - будет рекурсивно совпадать со всеми `.py` файлами в любой `subdir` папке на любой глубине. Например, `subdir/foo.py`, `subdir/nested/bar.py`, `parent/subdir/baz.py`, и `deep/parent/subdir/nested/qux.py`, но _не_`foo.py` на пути, не содержащем каталога `subdir` .
-
-
Опционально, чтобы предотвратить использование файла либо Агент кодирования Copilot одним из вариантов Обзор кода Copilot, добавьте
excludeAgentключевое слово в блок фронтматтера. Используйте либо или"code-review"``"coding-agent".Например, следующий файл будет читаться только .Агент кодирования Copilot
---
applyTo: "**"
excludeAgent: "code-review"
---
Если ключевое
excludeAgentслово не включено в передний блок Matterblock, оба Обзор кода Copilot и Агент кодирования Copilot будут использовать ваши инструкции. -
Добавьте пользовательские инструкции на естественном языке с помощью формата Markdown. Пробелы между инструкциями игнорируются, поэтому инструкции могут быть написаны как один абзац, каждый из которых находится на новой строке или разделен пустыми строками для удобочитаемости.
Вы успешно добавили в репозиторий пользовательский файл инструкций?
          <a href="https://docs.github.io/success-test/yes.html" target="_blank" class="btn btn-outline mt-3 mr-3 no-underline">
          <span>Да</span></a><a href="https://docs.github.io/success-test/no.html" target="_blank" class="btn btn-outline mt-3 mr-3 no-underline"><span>нет</span></a>
Пользуемые инструкции
Инструкции в файлах доступны для использования Copilot сразу после сохранения файла(ов). Инструкции автоматически добавляются к запросам, которые вы отправляете в Copilot.
Пользовательские инструкции не отображаются в представлении чата или встроенном чате, но вы можете убедиться, что они используются Copilot с помощью списка ссылок ответа в представлении чата. Если пользовательские инструкции были добавлены в запрос, отправленный в модель, .github/copilot-instructions.md файл будет указан в виде ссылки. Чтобы открыть файл, щелкните ссылку.

Включение или отключение пользовательских инструкций репозитория
Вы можете выбрать, хотите ли Copilot использовать пользовательские инструкции на основе репозитория.
Включение или отключение пользовательских инструкций для Копилот Чат
Пользовательские инструкции включены для Копилот Чат по умолчанию, но вы можете отключить или повторно включить их в любое время. Это относится к собственному использованию данных Копилот Чат и не влияет на других пользователей.
- Open the Setting editor by using the keyboard shortcut Command+, (Mac) / Ctrl+, (Linux/Windows).
- Type
instruction filein the search box. - Select or clear the checkbox under Code Generation: Use Instruction Files.
Включение или отключение пользовательских инструкций для Обзор кода Copilot
Пользовательские инструкции включены для Обзор кода Copilot по умолчанию, но их можно отключить или повторно включить в параметрах репозитория для GitHub.com. Это относится к Copilotиспользование пользовательских инструкций для всех проверок кода, которые он выполняет в этом репозитории.
-
На GitHubперейдите на главную страницу репозитория.
-
Под именем репозитория щелкните Settings. Если вкладка "Параметры" не отображается, выберите раскрывающееся меню и нажмите кнопку "Параметры".
-
В разделе "Код и автоматизация" боковой панели щелкните Copilot, а затем проверка кода.
-
Переключите параметр "Использовать пользовательские инструкции при проверке запросов на вытягивание" включено или выключение.
Enabling and using prompt files
Примечание.
- Файлы запроса Copilot находятся в public preview и подвергаются изменению. Файлы запросов доступны только в IDE VS Code, Visual Studio и JetBrains. Смотрите АВТОЗАГОЛОВОК.
- Примеры файлов запросов для определенных языков и сценариев в сообществе см. в репозитории GitHub Copilot Customizations .
Prompt files let you build and share reusable prompt instructions with additional context. A prompt file is a Markdown file, stored in your workspace, that mimics the existing format of writing prompts in Копилот Чат (for example, Rewrite #file:x.ts). You can have multiple prompt files in your workspace, each of which defines a prompt for a different purpose.
Enabling prompt files
To enable prompt files, configure the workspace settings.
- Open the command palette by pressing Ctrl+Shift+P (Windows/Linux) / Command+Shift+P (Mac).
- Type "Open Workspace Settings (JSON)" and select the option that's displayed.
- In the
settings.jsonfile, add"chat.promptFiles": trueto enable the.github/promptsfolder as the location for prompt files. This folder will be created if it does not already exist.
Creating prompt files
-
Open the command palette by pressing Ctrl+Shift+P (Windows/Linux) / Command+Shift+P (Mac).
-
Type "prompt" and select Chat: Create Prompt.
-
Enter a name for the prompt file, excluding the
.prompt.mdfile name extension. The name can contain alphanumeric characters and spaces and should describe the purpose of the prompt information the file will contain. -
Write the prompt instructions, using Markdown formatting.
You can reference other files in the workspace by using Markdown links—for example,
[index](../../web/index.ts)—or by using the#file:../../web/index.tssyntax. Paths are relative to the prompt file. Referencing other files allows you to provide additional context, such as API specifications or product documentation.
Using prompt files
-
At the bottom of the Копилот Чат view, click the Attach context icon ().
-
In the dropdown menu, click Prompt... and choose the prompt file you want to use.
-
Optionally, attach additional files, including prompt files, to provide more context.
-
Optionally, type additional information in the chat prompt box.
Whether you need to do this or not depends on the contents of the prompt you are using.
-
Submit the chat prompt.
For more information about prompt files, see Use prompt files in Visual Studio Code in the Visual Studio Code documentation.
Further reading
This version of this article is for using repository custom instructions and prompt files in Visual Studio. Click the tabs above for instructions on using custom instructions in other environments.
Введение
Пользовательские инструкции репозитория позволяют предоставлять Copilot с рекомендациями и предпочтениями для конкретного репозитория. Дополнительные сведения см. в разделе О кастомизации ответов GitHub Copilot.
Предварительные требования для пользовательских инструкций репозитория
-
У вас должен быть пользовательский файл инструкций (см. приведенные ниже инструкции).
-
The Enable custom instructions... option must be enabled in your settings. This is enabled by default. See Enabling or disabling repository custom instructions later in this article.
Creating custom instructions
Visual Studio supports two types of custom instructions. For details of which GitHub Copilot features support these types of instructions, see О кастомизации ответов GitHub Copilot.
-
Repository-wide custom instructions, which apply to all requests made in the context of a repository.
These are specified in a
copilot-instructions.mdfile in the.githubdirectory of the repository. See Creating repository-wide custom instructions. -
Path-specific custom instructions, which apply to requests made in the context of files that match a specified path.
These are specified in one or more
NAME.instructions.mdfiles within or below the.github/instructionsdirectory in the repository. See Creating path-specific custom instructions.If the path you specify matches a file that Copilot is working on, and a repository-wide custom instructions file also exists, then the instructions from both files are used.
Creating repository-wide custom instructions
-
In the root of your repository, create a file named
.github/copilot-instructions.md.Create the
.githubdirectory if it does not already exist. -
Add natural language instructions to the file, in Markdown format.
Whitespace between instructions is ignored, so the instructions can be written as a single paragraph, each on a new line, or separated by blank lines for legibility.
Creating path-specific custom instructions
-
Создайте каталог,
.github/instructionsесли он еще не существует. -
По желанию создайте подкаталоги
.github/instructionsдля организации ваших файлов инструкций. -
Создайте один или несколько
NAME.instructions.mdфайлов, гдеNAMEуказывается назначение инструкций. Имя файла должно заканчиваться.instructions.md. -
В начале файла создайте блок frontmatter, содержащий ключевое
applyToслово. Используйте синтаксис glob, чтобы указать, к каким файлам или каталогам применяются инструкции.Например:
---
applyTo: "app/models/**/*.rb"
---
Можно указать несколько шаблонов, разделив их запятыми. Например, чтобы применить инструкции ко всем файлам TypeScript в репозитории, можно использовать следующий блок frontmatter:
---
applyTo: "**/*.ts,**/*.tsx"
---
Примеры Glob:
-
`*` - все будут совпадать со всеми файлами текущей директории. -
`**` или `**/*` — все совпадут со всеми файлами во всех каталогах. -
`*.py` - будет совпадать со всеми `.py` файлами текущей папки. -
`**/*.py` - будет рекурсивно совпадать со всеми `.py` файлами во всех каталогах. -
`src/*.py`- будет `.py` совпадать со всеми `src` файлами в каталоге. Например `src/foo.py` , и `src/bar.py`_нет_`src/foo/bar.py`. -
`src/**/*.py` - будет рекурсивно совпадать со всеми `.py` файлами в `src` каталоге. Например, `src/foo.py`, `src/foo/bar.py`и `src/foo/bar/baz.py`. -
`**/subdir/**/*.py` - будет рекурсивно совпадать со всеми `.py` файлами в любой `subdir` папке на любой глубине. Например, `subdir/foo.py`, `subdir/nested/bar.py`, `parent/subdir/baz.py`, и `deep/parent/subdir/nested/qux.py`, но _не_`foo.py` на пути, не содержащем каталога `subdir` .
-
-
Опционально, чтобы предотвратить использование файла либо Агент кодирования Copilot одним из вариантов Обзор кода Copilot, добавьте
excludeAgentключевое слово в блок фронтматтера. Используйте либо или"code-review"``"coding-agent".Например, следующий файл будет читаться только .Агент кодирования Copilot
---
applyTo: "**"
excludeAgent: "code-review"
---
Если ключевое
excludeAgentслово не включено в передний блок Matterblock, оба Обзор кода Copilot и Агент кодирования Copilot будут использовать ваши инструкции. -
Добавьте пользовательские инструкции на естественном языке с помощью формата Markdown. Пробелы между инструкциями игнорируются, поэтому инструкции могут быть написаны как один абзац, каждый из которых находится на новой строке или разделен пустыми строками для удобочитаемости.
Вы успешно добавили в репозиторий пользовательский файл инструкций?
          <a href="https://docs.github.io/success-test/yes.html" target="_blank" class="btn btn-outline mt-3 mr-3 no-underline">
          <span>Да</span></a><a href="https://docs.github.io/success-test/no.html" target="_blank" class="btn btn-outline mt-3 mr-3 no-underline"><span>нет</span></a>
Пользуемые инструкции
Инструкции в файлах доступны для использования Copilot сразу после сохранения файла(ов). Инструкции автоматически добавляются к запросам, которые вы отправляете в Copilot.
Пользовательские инструкции не отображаются в представлении чата или встроенном чате, но вы можете убедиться, что они используются Copilot с помощью списка ссылок ответа в представлении чата. Если пользовательские инструкции были добавлены в запрос, отправленный в модель, .github/copilot-instructions.md файл будет указан в виде ссылки. Чтобы открыть файл, щелкните ссылку.

Включение или отключение пользовательских инструкций репозитория
Вы можете выбрать, хотите ли Copilot использовать пользовательские инструкции на основе репозитория.
Включение или отключение пользовательских инструкций для Копилот Чат
Пользовательские инструкции включены для Копилот Чат по умолчанию, но вы можете отключить или повторно включить их в любое время. Это относится к собственному использованию данных Копилот Чат и не влияет на других пользователей.
-
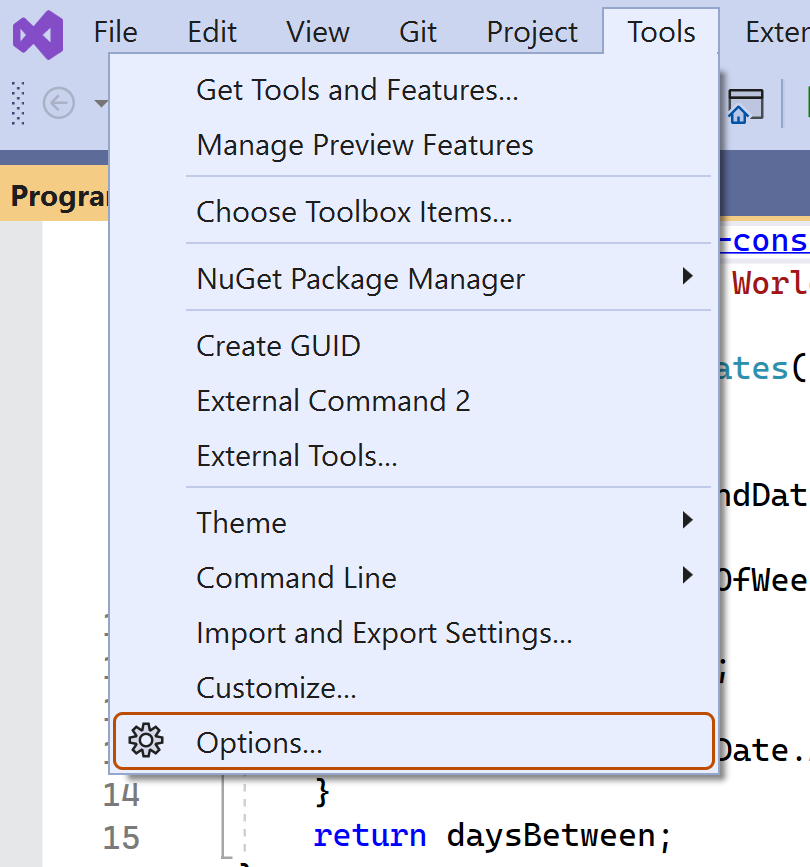
In the Visual Studio menu bar, under Tools, click Options.
-
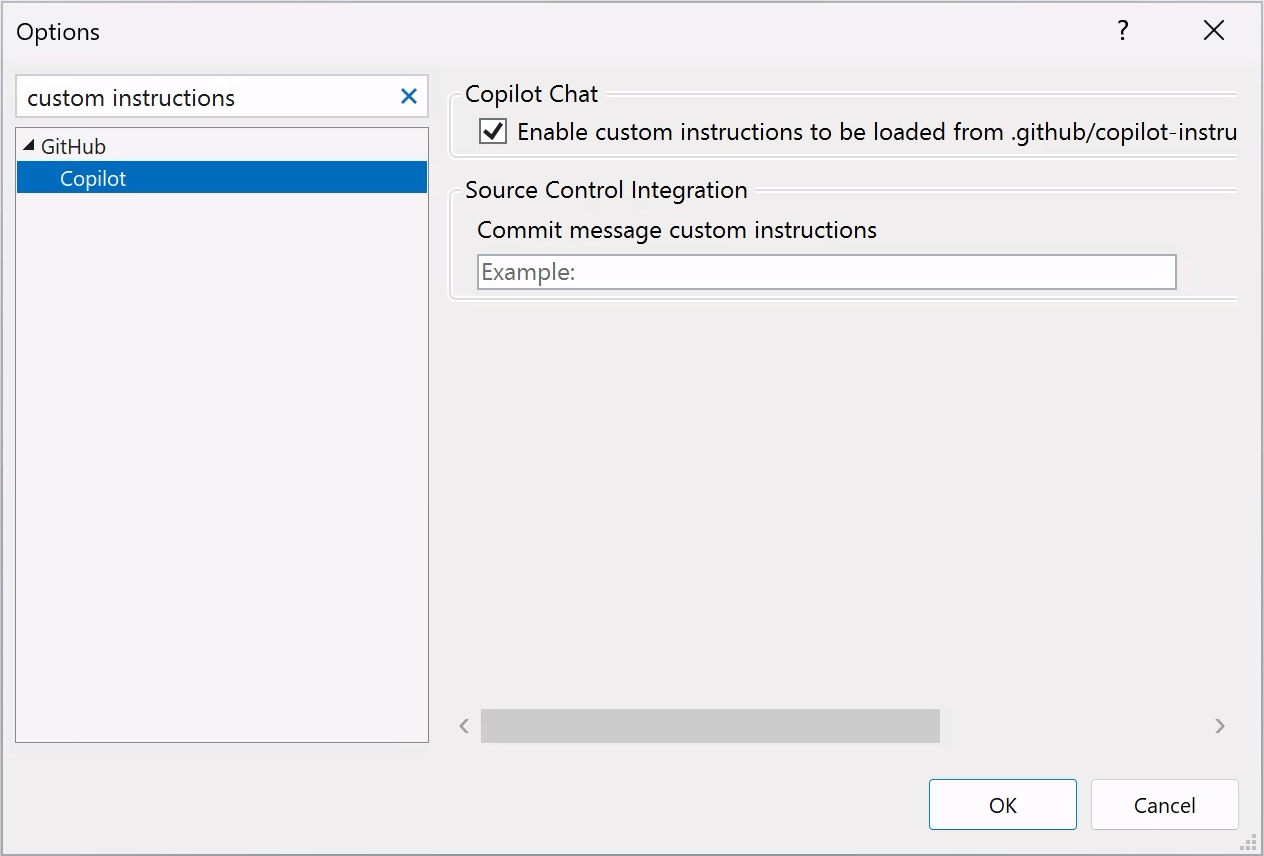
In the "Options" dialog, type
custom instructionsin the search box, then click Copilot. -
Select or clear the checkbox for Enable custom instructions to be loaded from .github/copilot-instructions.md files and added to requests.


Включение или отключение пользовательских инструкций для Обзор кода Copilot
Пользовательские инструкции включены для Обзор кода Copilot по умолчанию, но их можно отключить или повторно включить в параметрах репозитория для GitHub.com. Это относится к Copilotиспользование пользовательских инструкций для всех проверок кода, которые он выполняет в этом репозитории.
-
На GitHubперейдите на главную страницу репозитория.
-
Под именем репозитория щелкните Settings. Если вкладка "Параметры" не отображается, выберите раскрывающееся меню и нажмите кнопку "Параметры".
-
В разделе "Код и автоматизация" боковой панели щелкните Copilot, а затем проверка кода.
-
Переключите параметр "Использовать пользовательские инструкции при проверке запросов на вытягивание" включено или выключение.
Using prompt files
Примечание.
- Файлы запроса Copilot находятся в public preview и подвергаются изменению. Файлы запросов доступны только в IDE VS Code, Visual Studio и JetBrains. Смотрите АВТОЗАГОЛОВОК.
- Примеры файлов запросов для определенных языков и сценариев в сообществе см. в репозитории GitHub Copilot Customizations .
Prompt files let you build and share reusable prompt instructions with additional context. A prompt file is a Markdown file, stored in your workspace, that mimics the existing format of writing prompts in Копилот Чат (for example, Rewrite #file:x.ts). You can have multiple prompt files in your workspace, each of which defines a prompt for a different purpose.
Creating prompt files
-
Add a prompt file, including the
.prompt.mdfile name extension inside the.github/promptsfolder in the root of the repository. The name can contain alphanumeric characters and spaces and should describe the purpose of the prompt information the file will contain. -
Write the prompt instructions, using Markdown formatting.
You can reference other files in the workspace by using Markdown links—for example,
[index](../../web/index.ts)—or by using the#file:'../../web/index.ts'syntax. Paths are relative to the prompt file. Referencing other files allows you to provide additional context, such as API specifications or product documentation.
For more information about prompt files, see Use prompt files in Visual Studio in the Visual Studio documentation.
Further reading
This version of this article is for using repository custom instructions in JetBrains IDEs. Click the tabs above for instructions on using custom instructions in other environments.
Введение
Пользовательские инструкции репозитория позволяют предоставлять Copilot с рекомендациями и предпочтениями для конкретного репозитория. Дополнительные сведения см. в разделе О кастомизации ответов GitHub Copilot.
Предварительные требования для пользовательских инструкций репозитория
-
У вас должен быть пользовательский файл инструкций (см. приведенные ниже инструкции).
-
The latest version of the Copilot extension must be installed in your JetBrains IDE.
Creating custom instructions
JetBrains IDEs support a single .github/copilot-instructions.md custom instructions file stored in the repository, and a locally stored global-copilot-instructions.md file.
You can create the .github/copilot-instructions.md file in your repository using the Copilot settings page, or you can create the file manually.
Whitespace between instructions is ignored, so the instructions can be written as a single paragraph, each on a new line, or separated by blank lines for legibility.
Using the settings page
- В интегрированной среде разработки JetBrains выберите меню "Файл " (Windows) или имя приложения в строке меню (macOS), а затем нажмите кнопку "Параметры".
- В левой боковой панели нажмите «Инструменты», нажмите GitHub Copilot., then click Customizations.
- Under "Copilot Instructions", click Workspace or Global to choose whether the custom instructions apply to the current workspace or all workspaces.
Manually creating a workspace custom instructions file
-
In the root of your repository, create a file named
.github/copilot-instructions.md.Create the
.githubdirectory if it does not already exist. -
Add natural language instructions to the file, in Markdown format.
Once saved, these instructions will apply to the current workspace in JetBrains IDEs that you open with Copilot enabled.
Manually creating a global custom instructions file
To apply the same instructions across all workspaces in JetBrains IDEs, you can create a global custom instructions file on your local machine.
-
Open your file explorer or terminal.
-
Navigate to the appropriate location for your operating system:
- macOS:
/Users/YOUR-USERNAME/.config/github-copilot/intellij/ - Windows:
C:\Users\YOUR-USERNAME\AppData\Local\github-copilot\intellij\
- macOS:
-
Create a file named
global-copilot-instructions.mdin that directory. -
Add your custom instructions in natural language, using Markdown format.
Once saved, these instructions will apply globally across all workspaces in JetBrains IDEs that you open with Copilot enabled.
Вы успешно добавили в репозиторий пользовательский файл инструкций?
          <a href="https://docs.github.io/success-test/yes.html" target="_blank" class="btn btn-outline mt-3 mr-3 no-underline">
          <span>Да</span></a><a href="https://docs.github.io/success-test/no.html" target="_blank" class="btn btn-outline mt-3 mr-3 no-underline"><span>нет</span></a>
Пользуемые инструкции
Инструкции в файлах доступны для использования Copilot сразу после сохранения файла(ов). Инструкции автоматически добавляются к запросам, которые вы отправляете в Copilot.
Пользовательские инструкции не отображаются в представлении чата или встроенном чате, но вы можете убедиться, что они используются Copilot с помощью списка ссылок ответа в представлении чата. Если пользовательские инструкции были добавлены в запрос, отправленный в модель, .github/copilot-instructions.md файл будет указан в виде ссылки. Чтобы открыть файл, щелкните ссылку.
Using prompt files
Примечание.
- Файлы запроса Copilot находятся в public preview и подвергаются изменению. Файлы запросов доступны только в IDE VS Code, Visual Studio и JetBrains. Смотрите АВТОЗАГОЛОВОК.
- Примеры файлов запросов для определенных языков и сценариев в сообществе см. в репозитории GitHub Copilot Customizations .
Prompt files let you build and share reusable prompt instructions with additional context. A prompt file is a Markdown file, stored in your workspace, that mimics the existing format of writing prompts in Копилот Чат (for example, Rewrite #file:x.ts). You can have multiple prompt files in your workspace, each of which defines a prompt for a different purpose.
When writing prompt instructions, you can reference other files in the workspace by using Markdown links—for example, [index](../../web/index.ts)—or by using the #file:../../web/index.ts syntax. Paths are relative to the prompt file. Referencing other files allows you to provide additional context, such as API specifications or product documentation.
Once prompt files are saved, their instructions will apply to the current workspace in JetBrains IDEs that you open with Copilot enabled.
Creating prompt files using the command line
- Create the
.github/promptsdirectory if it doesn't already exist in your workspace. This directory will be the location for your prompt files. - Create a prompt file in the
.github/promptsdirectory. The prompt file name can contain alphanumeric characters and spaces and should describe the purpose of the prompt information the file will contain. The file name must end with the.prompt.mdfile name extension, for exampleTESTPROMPT.prompt.md. - Write the prompt instructions using Markdown formatting, and save the file.
Creating prompt files using the settings page
- В интегрированной среде разработки JetBrains выберите меню "Файл " (Windows) или имя приложения в строке меню (macOS), а затем нажмите кнопку "Параметры".
- Under Tools, under GitHub Copilot, click Edit Settings.
- Under "Settings Categories", click Customizations.
- Under "Prompt Files", click Workspace, to create a prompt file in your workspace.
- Enter a name for the prompt file, excluding the
.prompt.mdfile name extension. The prompt file name can contain alphanumeric characters and spaces and should describe the purpose of the prompt information the file will contain. - Click Ok to save the prompt file name.
- Write the prompt instructions using Markdown formatting, and save the file.
Using prompt files
-
In the chat input box, type
/followed by the name of the prompt file. For example,/TESTPROMPT. -
Optionally, attach additional files, to provide more context.
-
Optionally, type additional information in the chat prompt box.
Whether you need to do this or not depends on the contents of the prompt you are using.
-
Submit the chat prompt.
Further reading
This version of this article is for using repository custom instructions in Xcode. Click the tabs above for instructions on using custom instructions in other environments.
Введение
Пользовательские инструкции репозитория позволяют предоставлять Copilot с рекомендациями и предпочтениями для конкретного репозитория. Дополнительные сведения см. в разделе О кастомизации ответов GitHub Copilot.
Предварительные требования для пользовательских инструкций репозитория
-
У вас должен быть пользовательский файл инструкций (см. приведенные ниже инструкции).
-
The latest version of the Copilot extension must be installed in Xcode.
Creating custom instructions
Xcode supports a single .github/copilot-instructions.md custom instructions file stored in the repository.
You can create a custom instructions file in your repository via the Copilot settings page.
Whitespace between instructions is ignored, so the instructions can be written as a single paragraph, each on a new line, or separated by blank lines for legibility.
- Open the GitHub Copilot for Xcode application.
- At the top of the application window, under Settings, click Advanced.
- To the right of "Custom Instructions", click Current Workspace or Global to choose whether the custom instructions apply to the current workspace or all workspaces.
Вы успешно добавили в репозиторий пользовательский файл инструкций?
          <a href="https://docs.github.io/success-test/yes.html" target="_blank" class="btn btn-outline mt-3 mr-3 no-underline">
          <span>Да</span></a><a href="https://docs.github.io/success-test/no.html" target="_blank" class="btn btn-outline mt-3 mr-3 no-underline"><span>нет</span></a>
Пользуемые инструкции
Инструкции в файлах доступны для использования Copilot сразу после сохранения файла(ов). Инструкции автоматически добавляются к запросам, которые вы отправляете в Copilot.
Пользовательские инструкции не отображаются в представлении чата или встроенном чате, но вы можете убедиться, что они используются Copilot с помощью списка ссылок ответа в представлении чата. Если пользовательские инструкции были добавлены в запрос, отправленный в модель, .github/copilot-instructions.md файл будет указан в виде ссылки. Чтобы открыть файл, щелкните ссылку.
Further reading
Примечание.
This feature is currently in public preview and is subject to change.
This version of this article is for using repository custom instructions in Eclipse. Click the tabs above for instructions on using custom instructions in other environments.
Введение
Пользовательские инструкции репозитория позволяют предоставлять Copilot с рекомендациями и предпочтениями для конкретного репозитория. Дополнительные сведения см. в разделе О кастомизации ответов GitHub Copilot.
Предварительные требования для пользовательских инструкций репозитория
-
У вас должен быть пользовательский файл инструкций (см. приведенные ниже инструкции).
-
The latest version of the Copilot extension must be installed in Eclipse.
Creating custom instructions
Eclipse supports two types of repository custom instructions: workspace and project custom instructions.
To create a workspace custom instructions file, you can use the Copilot settings page. To create a project custom instructions file, you can create the file manually in the project directory.
Whitespace between instructions is ignored, so the instructions can be written as a single paragraph, each on a new line, or separated by blank lines for legibility.
Creating a workspace custom instructions file
- To open the Копилот Чат panel, click the Copilot icon () in the status bar at the bottom of Eclipse.
- From the menu, select "Edit preferences".
- In the left pane, expand GitHub Copilot and click Custom Instructions.
- Select Enable workspace instructions.
- In the "Workspace" section, under "Set custom instructions to guide Copilot's code suggestions in this workspace", add natural language instructions to the file, in Markdown format.
Creating a project custom instructions file
- In the root of your project directory, create a file named
.github/copilot-instructions.md. - Add your custom instructions in natural language, using Markdown format.
Once saved, these instructions will apply to the current project in Eclipse that you open with Copilot enabled.
Вы успешно добавили в репозиторий пользовательский файл инструкций?
          <a href="https://docs.github.io/success-test/yes.html" target="_blank" class="btn btn-outline mt-3 mr-3 no-underline">
          <span>Да</span></a><a href="https://docs.github.io/success-test/no.html" target="_blank" class="btn btn-outline mt-3 mr-3 no-underline"><span>нет</span></a>
Пользуемые инструкции
Инструкции в файлах доступны для использования Copilot сразу после сохранения файла(ов). Инструкции автоматически добавляются к запросам, которые вы отправляете в Copilot.
Further reading
- Поддержка различных типов пользовательских инструкций
- Пользовательские инструкции—a curated collection of examples